If you want to create a headshot with the correct proportions, cropping your portraits is an easy way to make your photos look good. There are many different ratios that you can use to achieve the perfect proportion. You can crop your portraits according to the correct size using the Square, Rule or thirds and 4:3 ratios. You can also manually adjust the size of the portraits using the sizing handle.
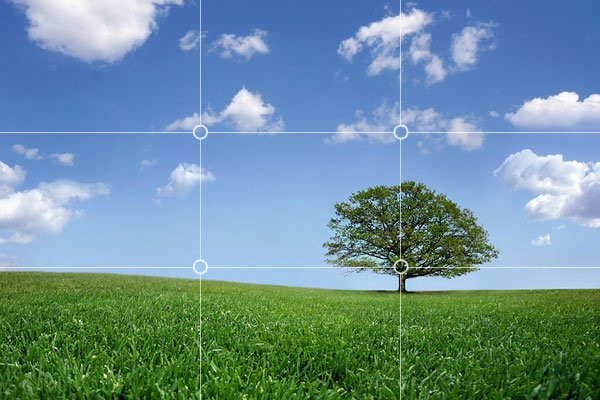
Rule of thirds
Consider the rule of threes when photographing a subject. This technique is extremely useful when taking pictures. It guides the eye to areas that are interesting and helps you tell stories. This idea can be used for any type photography, from portraiture to macro shots and landscape shots. Here are some tips and tricks to crop your portraits for the best composition.

Golden ratio
A good technique to use when taking portraits is the golden proportion. It emphasizes how proportional the face is. Although it is possible to capture the perfect golden proportion in portraits, it can sometimes be difficult. To achieve this, you can use a grid (such as the Rule of Thirds) or a spiral to position your subject. Next, calculate the exact location using the golden ratio.
Square ratio
If you are cropping a portrait, it is possible to choose a square ratio. While this aspect ratio can be retroactive, it is a fun and versatile composition. A portrait of a moving subject can be difficult to capture in portrait format. You can place the focal point of your portrait in the center frame with a square crop. You'll also have more space for other shapes to be incorporated into the image.
4:3
You will need to make some adjustments if you wish to print your photos in 4:3 ratio. The first thing you should do is adjust the photo's size. Normal size of printed photos is 8x10 inches. If you want to print them larger than that, you will have to crop them to a 4:3 ratio. You will be able to use the images on social media and print them at the same ratio.
Avoid severing fingers and toes
It's important that portraits are cropped at the edges of the frame. Too often, people have their fingers and toes cut off. Instead, crop your portrait to just above the knee or mid-thigh. If the subject's fingers or toes touch the edges of the frame, crop them away to keep the natural shape. It is common to crop these elements out of a photo.
FAQ
What camera is best for beginners and what are the pros and cons?
The best camera for beginners will depend on your budget, needs and level of skill.
If you are looking to save money, then a point and shoot digital camera might be the best option. These cameras can be very versatile, but they offer excellent quality.
Digital Single Lens Reflex cameras come with interchangeable lenses which allow you to capture different types of images. While they are more expensive than point and shoots, they offer much more flexibility.
For beginners to photography, the beginner's set is a great place for you to start. Everything you will need, including a tripod, flash, memory cards and lens, can be found in one package.
Don't forget to buy extra batteries too!
What Camera Should I Get
That all depends on what kind of photographer you want to become. If you're just getting started, a basic point and click camera will suffice.
However, once the basics are mastered, it's likely that you will want more advanced features. It all comes down to personal preference.
Here are some things to consider before purchasing a camera.
-
Features: What features are you looking for? Do you plan to use manual settings, autofocus, or both? What number of megapixels has your camera? Is there a lookfinder?
-
Price: How much do you want to spend? Are you going to buy a new camera every year?
-
Brand: Are you happy with the brand that you choose? There is no reason you should settle for less.
-
Functionality: Can you use your camera in low light situations? Can you take high resolution photos?
-
Image Quality: How clear, sharp, and crisp are your images.
-
Battery Life: How long can your camera last before it needs to be charged?
-
Accessories: You will be able attach additional lenses, flashes and other accessories. ?
How can I be a great photographer?
Photography is an art form that requires practice, patience, dedication, and above all else, passion. Photography is a passion. You will be able to do much more than if your goal was to make a buck.
You must learn how to use your digital camera correctly. Understanding composition, lighting, exposure and depth of field are all important. Additionally, you should have a good grasp of Photoshop.
Photography is not easy, but once you master it, there is nothing quite as satisfying as creating images that capture moments in time that would otherwise have been lost forever.
Learn more about the subject and then take classes or participate in competitions to enhance your skills. You'll gain experience and confidence which will lead to further improvement. What equipment will I need?
It all depends on the type of photography that you are interested in. If you are interested landscape photography, you will need to have a wide-angle zoom lens.
A telephoto lens will be a must if you are interested in portrait photography.
A tripod is crucial for taking photographs. It allows you to stand back and compose your picture without moving around.
A camera bag can be used to carry your camera, memory cards, or other accessories.
A flash unit is necessary if you are using a compact camera.
An DSLR (Digital Single Lens Reflex) is the best camera for beginners wanting to take professional quality photographs.
DSLRs are great because they let you control every aspect in your photo including shutter speed (aperture, ISO sensitivity), white balance, focus and white balance. These cameras also offer a variety of features, such as autofocus (auto-exposure locking), self-timer bracketing and RAW format.
Statistics
- Get 40% off Adobe Creative Cloud(opens in new tab) (creativebloq.com)
- This article received 13 testimonials, and 100% of readers who voted found it helpful, earning it our reader-approved status. (wikihow.com)
- In this case, 100% of readers who voted found the article helpful, earning it our reader-approved status. (wikihow.com)
- By March 2014, about 3 million were purchased monthly, about 30 percent of the peak sales total. (en.wikipedia.org)
External Links
How To
How to take pictures in low lighting conditions
Low-light photography is the art of taking photographs in dark or dimly lit environments. It requires special equipment. Controlling exposure, white balance, sharpness, and contrast are the main challenges. Low light photography can be divided into two categories: ambient and flash. Flash photography works well when you have enough light. A flash is required if there isn’t enough light. For example, if your subject is indoors but outside, there might not be enough light to capture a good picture without a flash. A flash is not necessary if you aren't interested in shooting at night with the moonlit hours. This way, you'll get some nice colors and shadows. Another option is taking photos at twilight. Twilight occurs when there is still daylight but the sun has set.
You may also want to experiment with long exposures. Long exposures can be used to capture images even if the shutter has been closed for several minutes. If the shutter is closed, the camera records only the light that falls onto the sensor. This light will continue to fall onto your sensor after a long exposure. But, the shutter remains closed and no new light enters. You will see very little movement as a result. You can ensure clear images by turning off automatic settings such as autofocus or autoexposure. Also, make sure that you adjust the ISO setting before you start shooting. An ISO setting of 200 allows you to adjust how bright or dark the image looks. The shutter button should be pressed quickly when you are ready to take the photo. This will make the shutter close completely. Next, hold the shutter button down until the end. You will prevent additional light from entering your camera by keeping the shutter button down. After you've taken the picture, wait a few seconds before releasing the shutter button. This allows the camera to process the image. While the image is processing, you can see your photos on your computer monitor. Once you're satisfied with them, save them to your computer.