Photography tips for beginners include shooting silhouettes, using a tripod and photographing moving objects. These are just a few of the ways that you can make your photographs look better. The possibilities are endless and can help you discover your photographic potential. Continue reading to learn more. Don't forget sharing your creations with other people!
Shooting silhouettes
Silhouettes are perfect for capturing beautiful shapes in an image. These photos can be romantic, depicting love scenes or dancing figures. Lighting is key to creating a stunning silhouette photograph. There are many ways to create a silhouette photograph. Begin by selecting a neutral background.
First, frame the scene with your subject. Make sure the background is not too blurry. Remember to use a slow shutter speed and low ISO. You can also download apps that can help you create a silhouette from your photo.
Getting starburst effect
The first step to creating a starburst effect with your camera is setting the right settings. You might try either a large aperture or a small aperture depending on the camera. You can usually control your aperture with DSLRs or mirrorless cameras. Mobile phones may not allow wide apertures.
One point of light, far enough away, is the best way for starburst to occur. The light source can be either the sun or a lightbulb. When using a light bulb, set the aperture to the highest number, but remember to avoid direct sunlight.
A tripod is recommended
Using a tripod is important when you are taking photos. Tripods are more stable than a camera on a single leg, and they are especially useful for 360-degree panoramas. A tripod can help you avoid reflections in mirrors. A tripod can help you compose your photos in an easier and more thoughtful way.
Before using a tripod, ensure you have enough counterbalance. The counterbalance is usually measured in pounds but can also be measured in kilograms. The term counterbalance comes from sailing, where sailors used counterweights to balance out their ships. This is similar in concept to a tripod that needs enough weight to hold it upright.
Photographing moving objects
It is a completely different approach to photographing moving objects than for stationary subjects. You must pay special attention to the composition and lighting of your shot, as well take special steps to ensure your subject is sharp and in focus. Although this can seem difficult at first, you will get better with time.
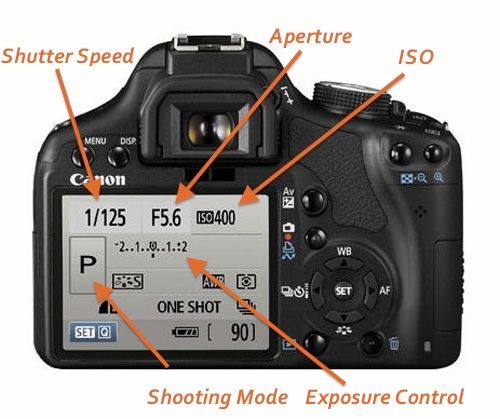
Your camera's shutter speed is key for this purpose. To capture motion blur or freeze action the shutter speed can be altered. If you are photographing a car for example, you could use a shutter speed up to 1/500th of an second. This speed will allow you keep your subject sharp, even when it is moving. Also, it will prevent blurred shots.
Photographing abandoned buildings
Abandoned buildings offer a unique photo opportunity. However, the lighting is usually poor, so it is important to use a flashlight to help you get around. A flash will help you focus. You will also need to manually set your camera's ISO to 800 or higher. A tripod will also help keep the lighting even and pick up textures. Consider using image stabilization if you are shooting handheld.
An abandoned building can be difficult to photograph, but there are some places that still have vibrant, colorful areas. Remember to be mindful of perspective distortion especially in buildings that have straight walls and pillars. This can be prevented by using either a tilt shift lens or an ultrawide lens. A person can also help you determine the ceiling's height.
How to take pictures of toys
You can create great images with toys if you're skilled at creating dynamic effects. Attach the toy with a ruler to capture its movement. You can also add dynamic to the photos by adding smoke or dirt effects. A humorous approach to keeping viewers' attention can also work.
As with any genre, toy photography requires practice to perfect, and mistakes are expected. To find your own style, practice and keep practicing. You can experiment with different settings and gears until you find the one that works best for your needs. It is also best to start small and do not upgrade gear too soon. Choose a camera that fits your style and budget. Network with other photographers. They may have valuable tips and tricks.
FAQ
Do I Need A Tripod?
This is a question everyone asks. The truth is that a tripod isn't always necessary, but it can come in handy.
This allows you to keep your camera steady even when taking slow shutter speeds. A tripod is a great option for landscapes and other stationary subjects.
A tripod can also cause blurriness when you are photographing people or sports. How can you tell which situations call for a tripod and why?
A tripod is useful in situations where you want to take pictures of fast action and stationary subjects. Examples include:
-
Sports
-
People
-
Landscapes
-
Close-ups
-
Macro shots
If you're unsure whether you need a tripod, try this test. Take your camera and hold it still. Then, look through the scope. If blurred lines appear or you feel movement, you will definitely need a tripod.
If you don't see any blurring, you probably won't notice any improvement by adding a tripod.
These are just a few tips to help you decide whether or not to purchase a tripod.
-
Smooth legs are important for tripods. This will stop unwanted vibrations shaking your camera.
-
You should choose a sturdy tripod. Some tripods are made out of plastic and may not be very durable. Look for a metal tripod instead.
-
Consider purchasing a remote release. This allows you to control your camera remotely. You can set it to fire the shutter once you press the button automatically.
-
Try to find a tripod with a head that rotates 360 degrees. This allows you to place your camera horizontally and vertically.
-
Keep in mind that tripods aren't cheap. Expect to spend between $100 and $200. However, you'll get a lot of value for your money.
-
Don't forget accessories such as memory cards or filters.
-
Before you buy online, make sure to check your local shops. Many retailers offer free shipping.
-
Review a product to find out what other customers think.
-
Ask family members or friends to share similar products.
-
To learn more about customer experiences, you can visit forums and message board.
-
User reviews can be found online.
-
Use websites like Amazon.com to compare prices and read customer feedback.
-
View photo galleries to see the different uses of tripods by photographers.
What equipment do I need to get started in digital photography?
The first thing you should consider when starting out in digital photography is what type of camera you want to use. There are many options: DSLRs (digital Single Lens Reflex Cameras), point-and–shoot compact cameras or camcorders. Each camera has different benefits and features. DSLR cameras can produce high-quality images, but they are usually heavier and more bulky than other types. Point-and–shoot cameras can be smaller and lighter than DSLR cameras, and they often have automatic settings that allow for special situations. Camcorders can record excellent video and have some still photography modes. Smartphones are lightweight, portable, and light. They offer excellent image quality, advanced features, such as GPS mapping, music playingback, and Internet browsing.
Once you've decided on the type of camera you'd like to buy, you will need to decide whether you would rather buy a used or new one. Cameras that have been used in recent years can often be found for a reasonable price. Newer models cost more, as manufacturers spend a lot of money on developing new technology.
Next, you will need lenses. Lenses play a key role in determining the quality of your photographs. They enable you to adjust the focal length of the lens so that you can zoom into the scene with no loss of focus. Some lenses can be equipped with flash units that are built-in, while others may require external flash units. There is a wide selection of lenses available from different brands. Each lens has its own characteristics.
Finally, you need to purchase memory cards. Memory cards save pictures taken with your camera. Depending on the size of your card, it could hold hundreds or even thousands of pictures. If you plan to shoot lots of pictures, you will need multiple memory cards.
Do I want to start taking photos as a hobby?
Photography is a wonderful way for you to capture your memories and share them. It also allows you to learn more about the world around you.
You can find many online resources to help you learn how to take better photographs.
You might also consider enrolling in classes at nearby community colleges or art schools. This will enable you to make connections with other photographers who are able to give valuable feedback.
What is rule of thirds for photography?
The rule of Thirds allows you to create unique compositions with minimal camera settings. It divides your image in nine equal parts, vertically and horizontally. This creates three main areas in which you want your subject. These are the top third (the upper left corner), middle third (center), and bottom third (lower right). These areas can be used as guidelines for positioning your subject within the frame.
The rule of Thirds helps you avoid placing crucial elements too close together. They might not have enough space to make an impact on the eye if they are placed close together. They may lose focus if they're too far apart.
Statistics
- This article received 13 testimonials, and 100% of readers who voted found it helpful, earning it our reader-approved status. (wikihow.com)
- That's the easiest way to get blurry photos 100% of the time. (photographylife.com)
- The second easiest way to get blurry photos 100% of the time is to use a cheap filter on the front of your lens. (photographylife.com)
- Get 40% off Adobe Creative Cloud(opens in new tab) (creativebloq.com)
External Links
How To
How to take macro photos in photography
Macro photography can be defined as the ability of taking pictures at close range of small objects, such insects or flowers. Macro comes from the Greek makros (makros) which means large. When you use a lens with a focal length greater than 50mm, you can take pictures of things that are very close up.
A macro lens with a good working distance should be able to capture sharp images even when you are not moving too much. You also want to avoid movement while taking photos because anything that moves during exposure could blur your image.
Here are some tips and tricks to make great macro shots:
-
Use a tripod. Use a tripod. This will ensure that you have less movement while shooting.
-
The right lighting is important. Most macro lenses come with built-in light filters, but if you don't have one already, buy one separately. It helps to prevent overexposure.
-
Be patient! Shooting macros takes practice. Sometimes you might only be able see a very small insect or flower. However, it's worthwhile to keep shooting until it appears.
-
Shoot in RAW format. RAW files store more data than standard JPEGs. Because you can edit the RAW files later, such as cropping or color corrections, they are ideal for editing.
-
It's important to remember the background. Sometimes the background can add interest to your shot, even if you have a great foreground object. Try to include it in your photo.
-
Keep learning.