There are many options for low-light photography. There are many options for low light photography. You can either use a diffuser or increase your ISO. In many cases, you can also use a flash to increase the light, or you can use a flash with a diffuser. If you are trying to capture an interior scene, you may want to balance the lights with your subject.
Increase the aperture
Low-light photography is all about the aperture. A wider aperture allows for more light to pass through. A wide aperture also ensures that a photo will be well-exposed.
Steady increase in ISO
You might wonder if increasing ISO will improve the quality of your images if you have taken photos under low lighting conditions. Although high ISO settings produce more grainy images than lower ISO settings, they offer an advantage. High ISO settings also increase the sensitivity of your camera's sensor, which makes the results better.
Flashes can be used
A flash is a good option for photographing in low light conditions. A flash can brighten a subject much more effectively than ambient light. It also has the advantage of allowing you to use a wider aperture and faster shutter speeds.
Use a diffuser
A diffuser helps spread light to a wider area, which helps reduce shadows and sharpen subjects. It is important to remember that diffusers can lose some light to the surrounding environment. This is distinct from light reflected off a reflector, which is concentrated light.
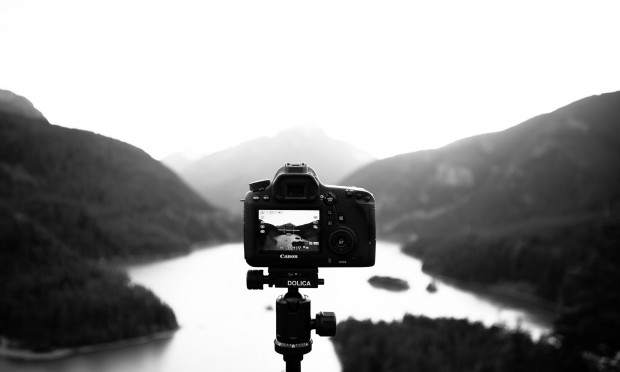
Use a tripod
A tripod is one way to get sharp pictures even in low light conditions. A tripod is much more convenient than hand-held photos. Instead of shaking your camera which can result in blurred images, a tripod will not be shaken. The shutter can stay open for up to several hours without blurring your photo. However, there are limitations to using a tripod. High winds can, for instance, cause tripod shake.
Mount your camera on a stable surface
Mounting your camera on a stable surface is essential when taking photographs in low light. You can use a table or chair for stability, or you can use a tripod or monopod. These accessories will let you pre-set your exposure, camera position and allow you to move freely and capture the moment.
A long exposure
You can use long exposures for many different photography situations. These can be used to photograph water, foliage, or clouds. Clouds can create stunning streaks of skyline and serve as leading lines. Also, moving water and cars can create some interesting images. These sources of motion can move at different speeds so you'll want to think about how you can capture them.
Increasing the CWB
The technique of increasing the CWB can improve the color balance in an image. It can be applied to a wide variety of subjects, including objects and foliage. Depending upon the light conditions, the amount and type of CWB used can be varied. For example, you can increase the contrast of a picture by using a brighter background, but it can also be decreased if you're shooting in low-light conditions.
Using a faster lens
When shooting photos in low light, using a fast lens is essential. Fast lenses are larger in aperture, which means they can gather more light and allow for faster shutter speeds. This allows for better exposure. This also makes it possible to shoot at lower ISOs. This helps reduce noise.
FAQ
What makes a good camera bag?
It is essential to choose a camera bag that protects your gear when you travel. Here are some factors to keep in mind when choosing a bag.
-
The bag should be large enough to comfortably hold your accessories and cameras. Don't purchase more than you are going to use.
-
Durability: Choose bags made from durable materials like leather, canvas or nylon. Avoid using plastic bags or fabric bags.
-
Protection: Make certain your bag is protected against dirt, dust, moisture, and scratches
-
Organization: Organize your gear by type so you can quickly access what you need. For example, put your lenses in one compartment, your memory cards in another, and your battery charger in yet another.
-
Comfort: Instead of carrying a bag, use a shoulder strap. Comfortable designs with padded shoulders are also recommended.
-
Price: Compare prices to get the best deal. Discounts are sometimes offered by some brands, which can be a bonus.
-
Warranty: Make sure to ask if they offer a warranty for their products. This will allow you to know who to contact if your bag becomes damaged.
Is digital photography hard?
Digital photography is not as simple as it seems. It takes time and effort to learn how to use the tools properly. You must know the right settings for different types shots. You can learn best by doing. Practice makes perfect.
Light Room can enhance your photos.
The best way to ensure you have the perfect photos for your project is to start early. It's better to take as much as possible, then select the best.
Lightroom makes it easy to do this. It lets you see how different settings impact each photo. These settings can be changed on the fly, without needing to return to Photoshop. This lets you quickly experiment with what looks great and what doesn't.
Do I Need A Tripod?
This is one those questions that everyone has to ask. While a tripod isn’t necessary every time, it is useful.
It allows you to hold your camera steady when taking pictures at slow shutter speeds. If you're shooting landscapes or other stationary subjects, then a tripod can make a big difference.
A tripod can also cause blurriness when you are photographing people or sports. So, how do you know which situations require a tripod?
A tripod is useful for any situation where you want to photograph fast action or stationary subjects. Examples include:
-
Sports
-
People
-
Landscapes
-
Close-ups
-
Macro shots
If you're unsure whether you need a tripod, try this test. Keep your camera still, and then look through the viewfinder. A tripod is required if there are blurred lines, movement or other issues.
If you don't see any blurring, you probably won't notice any improvement by adding a tripod.
However, if you do decide to invest in a tripod, here are some tips to keep in mind.
-
You should ensure that your tripod has smooth legs. This prevents unwanted vibrations from shaking your camera.
-
A tripod is a good choice. Some tripods are made of plastic, so they may not be as durable. Instead, choose a metal tripod.
-
You might consider purchasing a remote control. You can control your camera remotely with this remote release. The button can be pressed to activate the shutter.
-
Look for a tripod that has a 360-degree rotating head. This makes it easier to position your camera vertically or horizontally.
-
Remember that tripods can be expensive. Expect to spend around $100-200. However, you'll get a lot of value for your money.
-
Don't forget about accessories like filters and memory cards.
-
Check your local stores before buying online. Many retailers offer shipping free of charge.
-
Check out customer reviews to learn what they think about a product.
-
Ask friends and family members who own similar products.
-
To learn more about customer experiences, you can visit forums and message board.
-
Find user reviews online.
-
Amazon.com allows you to compare prices, and receive customer feedback.
-
Take a look at these photo galleries to see what other photographers do with tripods.
Photography is a great job.
Photography is an art that allows you take pictures and share them. If you are willing to work hard, photography can be a great way for you to make money. There are many opportunities to make a career as a professional photographer. As a hobby, you could take pictures of your family and friends. This would improve your confidence and skills. Once you have successfully completed this stage, it is possible to move on with paid assignments. Photographers who are the best earn a living doing what they love. Sometimes they travel with clients to capture images of people having fun at events like weddings or parties. However, most professionals prefer to shoot commercial projects such as product shots or advertisements.
To be a successful photographer, you must first identify what kind of photography interests you. You can then practice, experiment, learn, and master the art of photography. Experimentation is your best tool, so don't expect overnight success.
As a beginner, you should aim to develop your technical skills first before focusing on creativity. Photography encompasses both technical and artistic aspects. The best way to achieve success in photography is to master the fundamentals of composition and use the right tools.
It is important to consider whether you are interested in a full-time career or if you would like to work part-time. Some people combine their love of photography with other work. One example is working at a local magazine or newspaper while taking on freelance assignments. Others choose to dedicate their entire time to photography. You have to put in the effort and be committed to any creative endeavor.
If you're serious about making a career in photography, you will need to invest a lot of time and effort. So, think carefully about whether you really want to devote yourself to something like this.
What is the rule to thirds in photography
The rule of thirds is an easy way to create interesting compositions without using complicated camera settings. It divides your image into nine equal parts, horizontally and vertically. This divides your image into three areas that you would like to see your subject. These are the top third (the upper left corner), middle third (center), and bottom third (lower right). These areas can be used as guidelines for positioning your subject within the frame.
The rule of thirds also helps you avoid placing important elements too close together or too far apart. They may not be able to create a strong visual impact if they are too close together. They may lose focus if they're too far apart.
Statistics
- That's the easiest way to get blurry photos 100% of the time. (photographylife.com)
- The second easiest way to get blurry photos 100% of the time is to use a cheap filter on the front of your lens. (photographylife.com)
- Get 40% off Adobe Creative Cloud(opens in new tab) (creativebloq.com)
- While I cannot prove that all of those spots were not sensor dust, the photo was taken during a heavy snowstorm…so I guess that 99.8% of the spots are snowflakes. (bhphotovideo.com)
External Links
How To
How to take macro shots with photography
Macro Photography is defined as the ability to capture small objects such as flowers, insects, and even people at close range. Macro means large in Greek. It is possible to capture images of very close objects if you have a lens with a focal range greater than 50mm.
A macro lens with a good working distance should be able to capture sharp images even when you are not moving too much. It is important to avoid motion while taking photos. Anything that moves during exposure may blur your image.
Here are some tips and tricks to make great macro shots:
-
Use a tripod. Use a tripod. This way, you'll have less chance of moving while trying to shoot.
-
Pick the right lighting. You can get a macro lens with built-in lights filters. However, if you don’t have one, you can purchase one. It helps to prevent overexposure.
-
Be patient! Shooting macros takes practice. Sometimes you may only see a tiny bug or flower, but it's worth it to keep shooting until you catch it.
-
RAW file format allows you to shoot in it. RAW files are more detailed than standard JPEGs and contain more data. RAW files are better for editing later as you can make adjustments such as cropping and colour correction.
-
It's important to remember the background. Even if your foreground object is beautiful, the background can still add interest to your photo. You should include it in any photo.
-
Keep learning.