
This article will discuss the Rule of Thirds for macro photography, patterns in composition, and the importance of negative space to the subject's movement. These tips can help novices in composition create more interesting shots. Listed below are some composition tips that you should definitely keep in mind. These tips will improve your photographs! These tips will help you create an original, artistic portrait.
Rule of Thirds
You should adhere to the rules of composition in order to make your image more appealing. Place your main subject out of center on the right-hand vertical grid. This will give the image a balanced appearance. To avoid an image that feels cluttered or cluttered, place multiple subjects on opposite sides. For the background, follow the same procedure. Be sure to leave ample space in the background.
Centering the subject in a landscape shot is one of most common mistakes beginners make. It's easy to get distracted by the temptation to center your subject in fast-moving scenes, especially if the subjects are moving away from the camera. You can avoid this issue by using elements in the scene. All types of background photography can use the rules of Thirds. Here are some tips to help you get started:
Rule of Thirds in Macro Photography
You may have heard of the Rule of Thirds. Did you know it can also apply to macro photography? The most important rule for photography is that your subject should not be less than a third of the entire frame. This simple rule can help you take beautiful macro photographs of your subject. You don't have to use this rule for macro photography. You should experiment with different compositions if you want your images to stand out.
The rule of thirds is used in macro photography. First, divide your subject into threes. This will help you determine where to place your subject. You can place a stem of flowers along a vertical gridline. Or, you could place the flowerhead at the intersection between two gridlines. This will help make your macro photo look dynamic. Remember to apply the Rule of Thirds in post-processing.
Patterns in composition
In a photo, patterns are found all around us. They are everywhere. Although we may believe the outdoors is where to find patterns best, you can also find them in the interior. It's just a matter of being observant and looking for details you might otherwise miss. These are some great ways to incorporate patterns into your composition. This way, you can create an interesting composition with little effort.
Patterns in your compositions can add interest and scale to your photographs. You can also add depth, contrast, clarity, or clarity to your composition. Broken patterns can be added to the overall composition. Broken patterns can add a certain level of interest to the composition. They create an expectation that is felt by the viewer. This creates a sense of satisfaction, tension and anticipation. Photography patterns can be extremely helpful for composition. It is worth looking out for them.
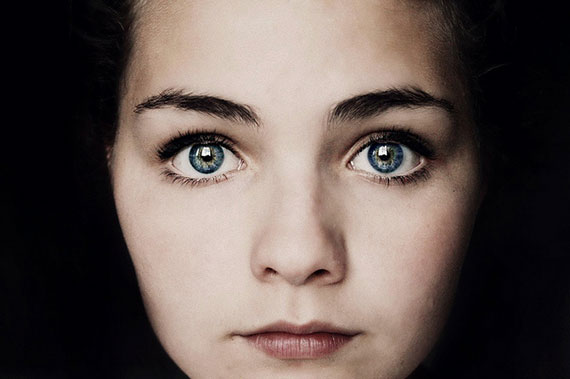
Negative space left in direction of subject’s motion
There are many options for incorporating negative space into a composition. It is easiest to eliminate everything except your subject and background. Many TV news scenes and commercials show subjects against a background of white seamless. In these cases, the subject becomes the focus. You can draw viewers' attention to your subject by using "negative space" to direct their motion in the same direction as the subject. However, this will still maintain balance.
Negative space can be used to add drama and mystery to your composition by directing the subject's gaze in that direction. This can help you implement the Rule of Thirds. Our eyes naturally follow lines that are in line with our subject's gaze. Also, putting your subject in front of a wall or neutral background will help place them in the proper position in the composition. If you're taking a portrait, leaving some empty space in the direction of the subject's motion can be helpful.
FAQ
Which Camera Should I Buy?
All depends on the type of photographer that you want to be. A basic point and shoot camera is enough if you are just starting.
However, once you've mastered the basics, you'll likely want something more advanced. The decision is yours.
These are some important things to think about before you purchase a new camera.
-
Features: What features will you require? Do you intend to use manual or autofocus settings? What number of megapixels does the camera have? Is there an optical viewfinder?
-
Price: How much do you want to spend? Are you going to buy a new camera every year?
-
Brand: Are you happy with the brand that you choose? There's no reason why you should settle for less than the best.
-
Functionality: Can your camera work in low-light conditions? Are you capable of taking high-resolution photographs?
-
Image Quality: How clear are your images and how sharp are they?
-
Battery Life: How long can your camera last before it needs to be charged?
-
Accessories: Will you be able to attach additional lenses, flashes, etc. ?
Do I Need A Tripod?
This is a question everyone asks. Although a tripod might not always be needed, they can be useful.
A tripod allows you to stabilize your camera when taking photos at slow shutter speeds. A tripod can be very useful if you want to photograph landscapes and stationary subjects.
However, a tripod can blurriness if you are photographing moving subjects, such as people or athletes. How do you determine which situations need a tripod?
A tripod is useful when you need to photograph stationary or fast moving subjects. Examples include:
-
Sports
-
People
-
Landscapes
-
Close-ups
-
Macro shots
This test will help you determine if you need a tripod. You can hold your camera still while you look through the lens. A tripod is required if there are blurred lines, movement or other issues.
A tripod won't make any difference if there is no blurring.
If you do decide on a tripod purchase, these are some things to remember.
-
You should ensure that your tripod has smooth legs. This will prevent unwanted vibrations from shaking your lens.
-
Use a sturdy tripod. Some tripods are made of plastic, so they may not be as durable. Consider a tripod made of metal.
-
You might consider purchasing a remote control. This allows you to control your camera remotely. It can automatically fire the shutter when you press the button.
-
Look for a tripod that has a 360-degree rotating head. This allows you to place your camera horizontally and vertically.
-
Be aware that tripods are not cheap. Expect to spend between $100 and $200. However, you'll get lots of value for your dollar.
-
Don't forget about accessories like filters and memory cards.
-
Before buying online, check with your local store. Many retailers offer free shipping.
-
Read reviews to determine what customers think about a particular product.
-
Ask your family members and friends to recommend similar products.
-
You can learn from customers' experiences by visiting message boards and forums.
-
Find user reviews online.
-
Amazon.com allows you to compare prices, and receive customer feedback.
-
See photo galleries to see some of the creative uses for tripods by photographers.
What equipment is necessary to begin digital photography
If you are just starting to get into digital photography, the most important thing is to choose which camera you would like. There are many options: DSLRs (digital Single Lens Reflex Cameras), point-and–shoot compact cameras or camcorders. Each model has its own unique features and advantages. DSLR cameras, for example, offer superior quality images but are heavier and larger than other types. Point-and–shoot cameras can be smaller and lighter than DSLR cameras, and they often have automatic settings that allow for special situations. Camcorders are capable of recording excellent video quality and can also be used to take still photos. Smartphones are small, light, and easy to carry around and offer great image quality and many advanced features such as GPS mapping, music playback, and Internet browsing.
Once you have made your decision on the camera type you wish to purchase, it is time to decide if you want to buy a used one or a brand new one. You can find affordable used cameras, particularly if you bought them in the last few years. Because manufacturers invest large sums of money in developing new technology, new models tend to be more expensive.
Next, purchase lenses. The quality of your photos is directly affected by the lens. They let you adjust the focal length to zoom in and out of the scene, without losing focus. Some lenses include built-in flash units. Others require external flash. There is a wide selection of lenses available from different brands. Each lens has its own characteristics.
Finally, you need to purchase memory cards. Memory cards can store pictures that were taken with your digital camera. Depending on the size of your card, it could hold hundreds or even thousands of pictures. If you plan to shoot lots of pictures, you will need multiple memory cards.
Which Lenses Are Best?
The most common question beginners ask is, "what lens should I buy?" It's a tough decision since there are so many options available.
The good news is you don't always need to buy a different lens with every purchase of a camera. Instead, you can add lenses later on.
Here are three types you might be interested in.
-
Wide Angle Lens (14mm to 24mm): These lenses allow you to see more of your subject from a wider angle. You can zoom in and not lose image quality.
-
Normal/Standard Zoom Lens (28mm - 70mm): These lenses allow you to change focal lengths while maintaining image quality.
-
Telephoto Zoom Lens (70mm to 200mm): These lenses make it easy to capture distant subjects. They let you focus on your subject even though they appear small in the frame.
These lenses can be combined in a variety of ways to create new effects. For example, you could use a normal lens to shoot close-up details and switch to a telephoto lens to capture far away objects.
Should I begin photography as a hobby.
Photography is a wonderful way to share memories with family and friends. Photography also lets you learn more about the world around.
You can find a lot of online resources that will teach you how to take better images.
It may be worth looking into classes at community colleges and art schools. This will enable you to make connections with other photographers who are able to give valuable feedback.
How can you become a skilled photographer?
Photography is an art form that requires patience, dedication, passion and dedication. Passionate about photography will make you do better than if it was just for the money.
You should learn how your camera works. You must understand composition, lighting, exposure, depth of field, etc. A basic understanding of Photoshop is essential.
Photography is not easy, but once you master it, there is nothing quite as satisfying as creating images that capture moments in time that would otherwise have been lost forever.
Learn more about the subject and then take classes or participate in competitions to enhance your skills. This will give you experience and confidence that will help you improve. What equipment do you need?
It all depends on the type of photography that you are interested in. A wide-angle lens is necessary for landscape photography.
If you are into portrait photography, you must invest in a telephoto lens.
When taking photos, a tripod is essential. It allows you stand up and compose your photo without moving.
A camera bag is useful for carrying your camera, memory cards, and other accessories.
If you're using a compact camcorder, a flash device is essential.
A DSLR (Digital Single Lens Reflex), camera is the best choice for novice photographers who wish to create professional-quality images.
DSLRs are great because they let you control every aspect in your photo including shutter speed (aperture, ISO sensitivity), white balance, focus and white balance. A variety of features are available such as autofocus and auto-exposure locks, bracketing, self-timer, and RAW formatting.
Statistics
- While I cannot prove that all of those spots were not sensor dust, the photo was taken during a heavy snowstorm…so I guess that 99.8% of the spots are snowflakes. (bhphotovideo.com)
- That's the easiest way to get blurry photos 100% of the time. (photographylife.com)
- There are people out there who will pick at flaws they can only see in 100% crops of your photos. (wikihow.com)
- By March 2014, about 3 million were purchased monthly, about 30 percent of the peak sales total. (en.wikipedia.org)
External Links
How To
How to photograph in low light conditions
Low-light photography refers to taking photos in dimly lit or dark environments. It requires special equipment. Controlling exposure, white balance, sharpness, and contrast are the main challenges. There are two types low-light photography: ambient and flash. Flash photography works best when there is enough lighting around. You will need a flash if you don't have enough natural light. For example, if your subject is indoors but outside, there might not be enough light to capture a good picture without a flash. A flash is not necessary if you aren't interested in shooting at night with the moonlit hours. You will get beautiful shadows and colors. Another option is to shoot during twilight. Twilight is when the sun sets but there's still daylight.
Also, you might want to try long exposures. Long exposures can be used to capture images even if the shutter has been closed for several minutes. When the shutter remains closed, the camera records only light that falls on the sensor. During a long exposure, this light continues to fall onto the photo sensor. The shutter was not opened, so no new light entered the lens. Therefore, there is very little movement. Turn off autofocus and autoexposure to ensure you get clear images. You should also adjust the ISO setting prior to you start taking photos. An ISO setting 200 gives you more control over how bright or dim your image appears. The shutter button should be pressed quickly when you are ready to take the photo. This causes the shutter to close completely. Then, you should hold the shutter button until the last possible second. To prevent additional light entering the camera, hold the shutter button down. Once you take the shot, wait a while before you release the shutter. This allows your camera to process the picture. While the image is processing, you can see your photos on your computer monitor. Once you are satisfied with the photos, save them onto your computer.